Introduction
I have been a blogger for two years now. It took two years to bring my blog to a decent shape and added 50+ blog articles. Most of this was done during the last 6 to 8 months. A few of my articles appear on page one of Google search, and others on pages 3, 4, 6, and even 10. Two or three articles do not even appear on Google search results.
I tried to analyze why some articles have come on page 1 of Google search while a few others could not even make it to the last page. This is when I thought of sharing my experience with my fellow beginner bloggers.
I have read articles and viewed many YouTube videos on ‘how to start a WordPress blog’ before venturing into my blog. Many of these articles and videos are very useful for a new blogger, but none of them teach you 100 percent about blogging. You will understand the hurdles and difficulties only after creating the blog.
I have come across many issues like the detailed installation of an SEO plugin, connecting my blog to Google Search Console, indexing issues, and many more. I could solve these issues by searching YouTube videos for solutions. I have concluded that nobody can teach you 100% about blogging, and I and you will learn it with experience.
I was freelancing on the internet and writing blog articles for other bloggers. So, I thought I can easily write articles for my blog. But it was not so. When I write for others, there is no headache of keywords, SEO, and other things. However, when I write for my blog, I have to consider all the factors for ranking.
I was watching YouTube videos on each subject to understand them. I have tried to put some of my experience into this article. I would be happy if this can offer little assistance to beginner and struggling bloggers like me.
You may take a tour of my blog ‘blogforcuriousmind‘.
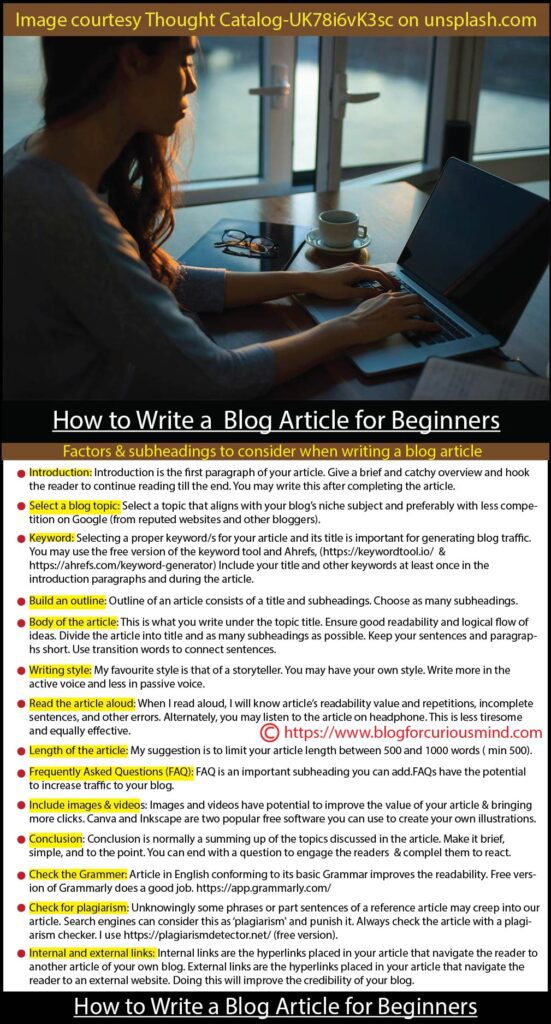
How to write a blog article for beginners
I will discuss the article topic ‘How to write a blog article for beginners’ under the following subheadings:
- Introduction to the article
- Select a blog topic
- Keyword
- Build an outline
- Body of the article
- Writing style
- Read the article aloud
- Length of the article
- Frequently asked questions
- Include videos and images
- Conclusion
- Check the Grammar
- Check for plagiarism
- Internal and external links
Introduction to the article
The introduction is the first paragraph of your article. Give a brief overview of what the reader can expect from your article. Make the overview catchy and hook the reader to continue reading till the end.
In a nutshell, your introduction should compel the reader to go further into your article and possibly end up with a good comment.
I always write the introduction paragraph at the end, after completing the article. However, you can do it in your own way.
Select a blog topic
Every blogger wants his/her blog article to rank top on Google search. The selection of the blog topic can play an important role in ranking. Keep the following factors in mind when selecting a blog topic.
- Select a topic that aligns with your blog’s niche subject.
- Competition: Search the blog topic on Google. If the search result shows numerous articles from reputed websites like Wikipedia, well-known universities, and bloggers, you have a tough job. You can either choose an alternate topic with less competition or create an excellent blog article to beat the competition.
Keyword
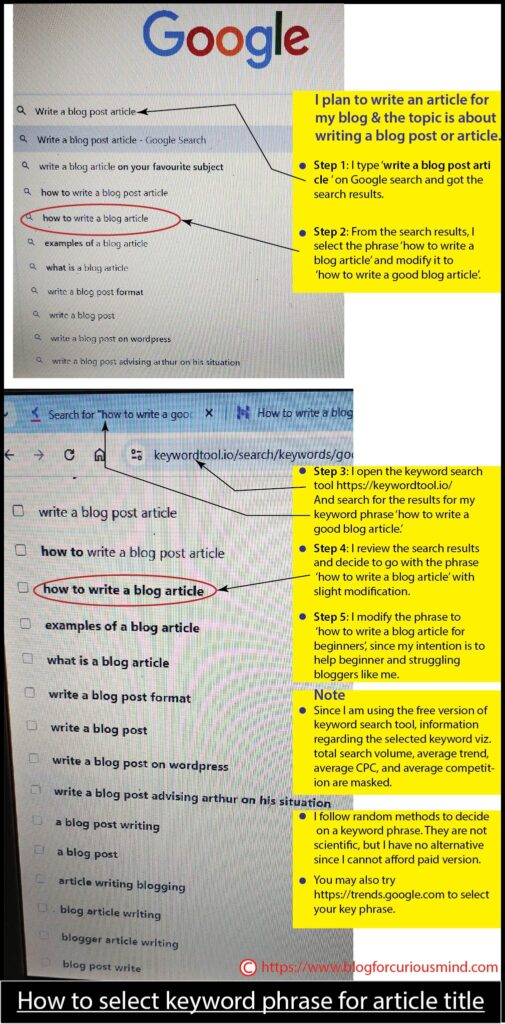
Selecting a proper keyword/s for your article and its title is important for generating blog traffic. However, the job is not simple.
Generally, when you enter a keyword or phrase in the keyword search tool, it gives multiple keyword alternates along with their total search volume, average trend, average CPC, and average competition. However, in the free version, you can only view the keyword alternates and the other data are masked.
I normally do some guesswork to select the keyword and leave the rest to luck. You can make your own strategy if you do not want to buy the pro version. Please watch videos on how to select keywords, there are many on YouTube.
I use the free version of the keyword tool and Ahrefs, you can try this or find your own.
Lastly, include your title and other keywords at least once in the introduction paragraphs and during the article. Make it look natural and never stuff the article with keywords by force.
Build an outline
The outline of an article consists of a title and subheadings. Choose meaningful, engaging, and catchy titles and subheadings. Each subheading can explain a part of your article topic. Choose as many subheadings as possible.
Body of the article
The body of the article is what you write under the topic title. Ensure good readability and logical flow of ideas. Following are few suggestions to improve the readability. However, do not limit yourself to only these suggestions, there is always scope to do more!
- Divide the article body into subheadings. Go for as many subheadings as possible. Keep the matter under each subheading brief and short. This facilitates your readers to quickly navigate to the subheadings of their interest.
- Keep your sentences short. Break long sentences into two or more short sentences to improve readability.
- Keep the paragraphs short, up to a maximum of 5 or 6 lines.
- Use transition words to connect sentences and to make them logical and smooth flow. Popular examples of transition words are ‘consequently, accordingly, hence, however, provided that, because, generally, though,’ etc. I have made a list of transition words and use them during editing.
Writing style
My favorite style is that of a storyteller. I normally write my articles as if I were explaining them to a group of students or children. I feel this style makes the article more readable. You may have your own style. Write more in the active voice and less in the passive voice.
If you have forgotten about active and passive voice in English Grammar, this and this YouTube videos may help you.
Read the article aloud.
When I read my article aloud, I will be able to assess its readability, including repetitions, incomplete sentences, and other errors. I always do it. But I have faced personal issues like my loud reading can disturb others at home.
So, I found an alternative for this. I use a ‘free text-to-speech‘ software and listen to my articles on headphones. I found this method to be less tiresome and equally effective.
Length of the article
In the initial period of my blogging, based on internet research, I wrote lengthy articles of 3000 to 4000 words. My information was ‘Google appreciates lengthy articles.’ However, it did not help me to rank on Google.
Consequently, I have decided to keep the article length around 1000 words or a maximum of 2000 words. If my article exceeds 2000 words, I will split it into two articles. This strategy is working for me both for ranking and increasing the article count.
My suggestion is to limit your article length between 500 and 1000 words (500 is the minimum). And, if the article becomes too lengthy, consider splitting it.
Frequently Asked Questions (FAQ)
FAQ is an important subheading you can add to the article. Select some questions that do not have answers on Google. You can use Google to make a list of frequently asked questions on your article topic. You may select some questions and create a better and more convincing answer.
FAQs have the potential to increase traffic to your blog.
Include images and videos.
It is important to add meaningful illustrations to improve the value of your article. Many times, my article appears on pages 4, 5, or 6 of Google search, but the article illustration (image) appears on page 1 or 2 of the relevant image search result. So, internet users may click on the image and reach my article.
Hence, you can use the images in your article as a powerful tool to improve the performance. But remember, only quality and meaningful images can rank top.
Canva and Inkscape are two popular free software programs you can use to create your own illustrations. There are plenty of YouTube videos to teach you how to use Canva and Inkscape to create illustrations. Never download the images from Google and use them. It is counterproductive.
A quality photograph on the article topic can simplify your task of creating an illustration. Unsplash and Freepik offer both free and paid images on various topics. The quality of the images is excellent. You can search for free images and download them. Read the terms and conditions of using their images. Do not forget to give credit to the image photographers in the article.
If you know how to create and edit videos, create a short video on the article, and share it. Videos are a powerful medium. Another advantage of images and videos is you can share them on social media pages like Facebook and Instagram. This will improve traffic to your blog.
Conclusion
The conclusion is normally a summing up of the topics discussed in the article. Make it brief, simple, and to the point. Some bloggers end the conclusion with a question to engage the readers and compel them to leave a comment. You can try this technique.
Check the Grammar
We all use social media and messaging services like WhatsApp, Facebook, X, Instagram, and others. One drawback of reading and sending messages in English on social media is that we do not care much about Grammar and make plenty of Grammatical errors.
An article in English conforming to its basic Grammar improves the readability. I use Grammarly to eliminate basic Grammatical errors. The free version of Grammarly does a good job. When your blog makes money, you may update to the paid version to make your article even better. You may explore and choose the software of your choice.
Check for plagiarism
While writing a blog article, we refer to different articles on the internet to confirm our ideas and to get new ideas and facts. There is no problem in doing this if we express the new ideas and facts in our own words.
However, unknowingly, some phrases or parts of sentences of the original article may creep into our article. Search engines can consider this ‘plagiarism‘ and punish.
To eliminate the above scenario, I always check my article with a free plagiarism checker. It is free for checking up to 1000 words per check. The free version is normally sufficient for a beginner blogger. You can upgrade to Pro when you grow.
Internal and external links
Internal links are the hyperlinks placed in your article that navigate the reader to another article of your own blog. Your web hosting service provider and WordPress allow you to create internal links. At the end of the article, you can share a list of similar articles on your blog and create their internal links. The interested reader can click on the link and read that article.
External links are the hyperlinks placed in your article that navigate the reader to an external website. You can use external links to share the articles or videos of other bloggers on the same topic.
Generally, we research on the internet for articles and videos on our topic and study them. They are our competitors. Studying those articles and videos can give us new insights and help to make our articles better. We can share some reputable articles (like Wikipedia) as references.
You may watch this YouTube video on how to write a blog post.
You may read the article ‘How to Publish a Blog Article on WordPress.’
Conclusion
In the foregoing paragraphs, we have discussed different factors considered while writing a blog article. But, which among them are the important factors? In my personal view, a good blog topic, writing style, illustrative images, and videos are the primary factors that can bring the article to the top of Google search. This is my experience over my two years of blogging.
Note: I am not affiliated with any company or website. Clicking on links in the article does not earn money for me. I have included those links as a help.
You may read the article: https://www.hostinger.com/in/tutorials/how-to-write-a-blog-post